Kết nối các thiết bị của Hass với Google Assistant
Hướng dẫn kết nối các thiết bị của Hass với Google Assistant.
Tham khảo:
+ Home Assistant : link
Cài đặt:
Bước 1: Tạo VERSION – Draft cho liên kết Google Assistant.
- Tạo dự án trong Actions on Google console.
- Thêm dự án mới.
- Chọn
Smart Home> chọnSmart home - Chọn
Build your Action> chọnAdd Action(s). Nhập URL của Hass nhà bạn:https://[YOUR HOME ASSISTANT URL:PORT]/api/google_assistanttrongFulfillment URL ,thay thế[YOUR HOME ASSISTANT URL:PORT]bằng tên miền URL của Hass nhà bạn. - Chọn
Save. ChọnOverviewmà sẽ đưa bạn đến trang chi tiết.
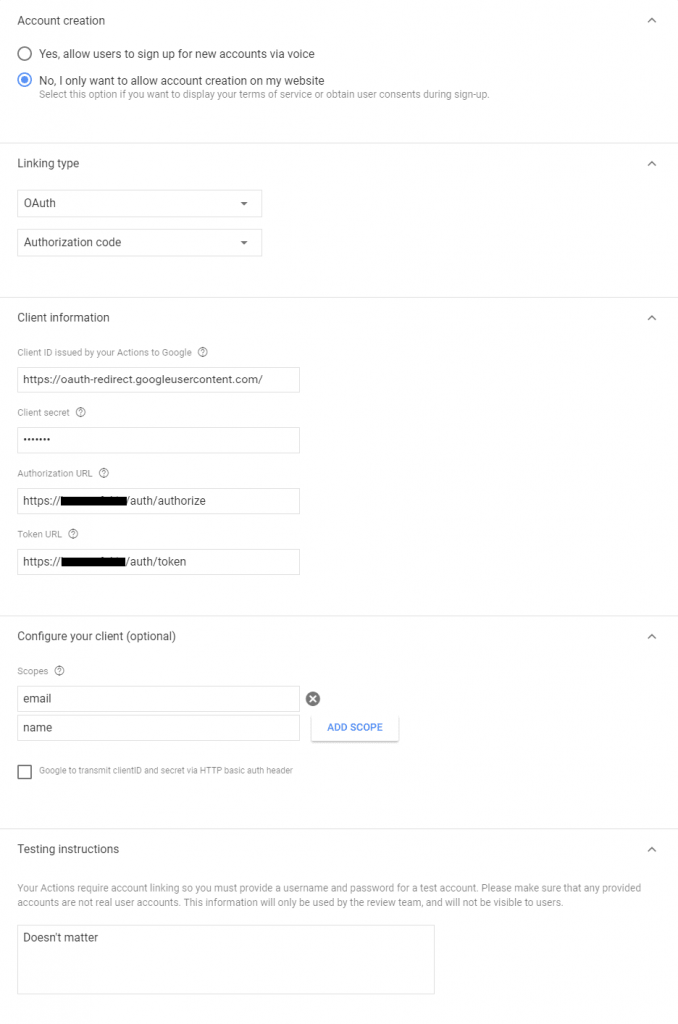
Account linkingđược yêu cầu khi liên kết với Home Assistant. Cài đặt phần này tạiQuick Setup.
- Chọn mặc định
No, I only want to allow account creation on my websitevà NhấnNext. - Mục
Linking typechọnOAuth>Authorization Code. ChọnNext - Client ID:
https://oauth-redirect.googleusercontent.com/, phải có / tại cuối URL. - Client Secret: ký tự bất kỳ. Home Assistant không cần mục này.
- Authorization URL:
https://[YOUR HOME ASSISTANT URL:PORT]/auth/authorize. => thay thế bằng URL của Hass nhà bạn. - Token URL:
https://[YOUR HOME ASSISTANT URL:PORT]/auth/token. NhấnNext - Configure your client: nhập
emailvà chọnAdd scope, nhậpname. - KHÔNG chọn
Google to transmit clientID and secret via HTTP basic auth header. NhấnNext - Testing instructions: ký tự bất kỳ. Nhấn
Save - Phía trên trang, chọn mục
Test.
Bạn đã hoàn thành cấu hình bản Test cho liên kết Google Assistant. Bản có thể qua bước 2.
Tạo GOOGLE SERVICE ACCOUNT ( bước này là tùy chọn ):
Dùng để đồng bộ các thiết bị từ Hass vào Google Assistant qua dịch vụ google_assistant.request_sync hoặc ra lệnh “Ok Google, sync my devices” trên Google Assistant.
Bạn vào liên kết sau: service account key
Chọn đúng tên Project bạn đã tạo ở bước trên.
Chọn New service account, nhập tên Service account name và Service account ID tuỳ ý.
Mục Role, kéo xuống và chọn Service Accounts > Service Account Token Creator.
Click CONTINUE and then DONE. You are returned to the service account list, and your new account is shown.
Click the three dots menu under Actions next to your new account, and click Manage keys. You are taken to a Keys page.
Click ADD KEY then Create new key. Leave the key type as JSON and click CREATE. A JSON file that contains your key downloads to your computer.
Use the information in this file or the file directly to add to the service_account key in the configuration.
Click Close.
Bạn chép file .json vừa tải về vào thư mục /config của Hass, cùng cấp với file configuration.yaml.
Cuối cùng, truy cập vào liên kết: overview , Chọn Enable để kích hoạt HomeGraph API.
Bước 2: Cấu hình trong configuration.yaml file của Hass:
+ Tham khảo thêm tại Home Assistant : link
Thêm google_assistant và các tùy chọn khác vào configuration.yaml file.
Xác định project ID:
![]()
Bước 3: Liên kết Google Assistant với Hass. Thực hiện trên Google Home app.
Mở Google Home app > vào tài khoản của bạn > Chọn + Set up or add, + Set up device > Chọn “Works with Google” > Tìm và Chọn mục [test] your app name > Liên kết với Hass sẽ mở ra > Nhập user / password của Hass.
Sau khi liên kết thành công, các thiết bị của Hass sẽ hiện tại màn hình chính của Google Home.
Lưu ý, nếu không làm bước Tạo GOOGLE SERVICE ACCOUNT, khi cần cập nhật thiết bị của Hass vào Google Assistant, bạn cần unlink và link lại.
